Information in this article applies to Safetica ONE 10 or older.
In this article, you will learn:
- How to connect your Active Directory
- How to import parts of your Active Directory
- Active Directory in Safetica user tree
- How to remove items from the user tree
- How to maintain the user tree
How to connect your Active Directory
Starting with Safetica 10, Active Directory items are loaded not only by hostname but also by SID (Security Identifier).
There are two ways to connect your Active Directory to Safetica Management Console and import nodes, security groups, or departments:
- The first option pops up in the configuration wizard right after Safetica installation. This step can be skipped and performed later (the second option).
- The second option is in Profile > Settings > Active Directory.
In case you use a different account, which isn't part of the current domain, enter your Active Directory username and password into the respective fields.
How to import parts of your Active Directory
To import parts of your Active Directory into the configured server, click the Add button. You have three import options:
- AD node – import selected nodes from your Active Directory into the configured server. After confirming the dialog, all the domain users and computers from these nodes will be loaded into Safetica user tree (in the same structure and groups as you have in your AD). Both users and computers are placed into an Active Directory synchronization group, from which you can copy them into other groups.
- Security group – if you have security groups defined in your Active Directory, you can choose which to import into the Safetica user tree.
- Department – if you have departments defined in your Active Directory, you can choose which to import into the Safetica user tree.
Use the Synchronize now button to force an update of users and computers from your Active Directory into the Safetica user tree. Active Directory is normally synchronized once per day or after the settings are changed.
Active Directory in Safetica user tree
You can see your Active Directory in the User tree on the left.
Built-in groups Active Directory and Unknown cannot be deleted.
You can expand all nodes in the user tree via the  button.
You can collapse all nodes in the user tree via the  button.
The  button updates the user tree - when the server name is followed by an asterisk, the tree has changed and needs to be updated.
You can also filter the items in the user tree via the  button.
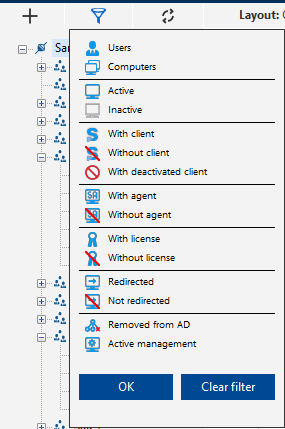
Names of deactivated endpoints are displayed in red color.
How to maintain the user tree
Duplicates can appear after administrator's actions such as hardware renewal - this can often include endpoint removal from AD, and its SID will change after it is added back. Despite choosing the same hostname, the endpoint becomes unique and a duplicate is created. Such duplicates receive a flag, indicating they are no longer in AD. You can use a filter in the user tree called Removed from AD to view them all. The administrator can then manually remove them from the user tree.
Data have their priority set based on users, so removing an endpoint duplicate will not cause any data loss until the user is deleted as well.