Applies to: Safetica On-Prem
Introduction
The most common causes of failing Safetica server updates are insufficient disk space and insufficient space in the database. If you are experiencing issues during Safetica server update, try performing the steps mentioned in this article.
In this article, you will find:
- Troubleshooting prerequisites
- First step
- Common causes of update failures
- When to contact Safetica Partner or Safetica Support
Troubleshooting prerequisites
Before attempting any of the troubleshooting steps below, ensure you have:
- Created a complete backup of your Safetica database.
- Installed SQL Server Management Studio (for database maintenance tasks).
First step
If you are experiencing issues with a Safetica update, first run the database maintenance script provided by Safetica.
The script can be downloaded here.
It can be run from Safetica Maintenance Console > Maintenance > Database management> Maintenance tab > Maintenance scripts.
The script performs the following actions:
- Finds orphaned records and removes them or restores the missing parent entries.
- Rebuilds indexes to eliminate fragmentation.
- Checks for disabled or missing foreign keys and re‑enables them.
- Shrinks the database to reclaim space.
If the issues persist, look at the causes and solutions below.
Common causes of update failures
Cause 1: Insufficient free disk space
Updates require adequate free disk space on both:
- The server hosting Safetica Management Service.
- The SQL server (where Safetica database (safetica_data) and tempdb are stored). Please note that the transaction log file (.ldf) can grow indefinitely.
If there is not enough disk space, the update will fail.
Solutions for insufficient disk space
- Delete unnecessary files to free up space.
- Move the database file and/or the transaction log (.mdf/.ldf) to a larger drive. Follow the steps in Microsoft documentation.
- Move backup files to another drive.
- If you use archiving tasks, configure the archive directory to a drive with sufficient space.
- You can also set the maximum size for safetica_data and tempdb databases to Unlimited (reccommended) or to a higher value to ensure sufficient database space:
1. In SQL Server Management Studio (SSMS), right-click the database name (safetica_data and tempdb).
2. Click Properties in the context menu.
3. Select Files in the left-hand menu.
4. You will find the growth settings in the Autogrowth / Maxsize column.
5. For each file (Data and Log):
a. Click the ellipsis (…) button in the Autogrowth / Maxsize column.
b. In Maximum File Size, select Unlimited (or sufficiently increase the Limited to (MB) value).
c. Click OK to confirm. 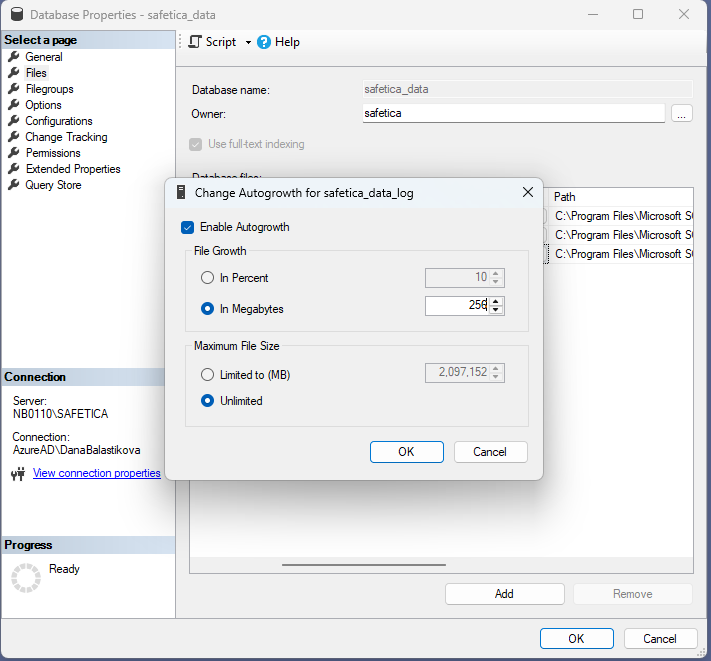
Optional: Set up alerts
To avoid similar issues in the future, you can set up alerts:
- Insufficient space on drive for databases: This alert applies to the drive where SQL server stores .mdf and .ldf files. Learn more about the alert here.
- Disk space of server data folder is running low: This alert applies to the server where Safetica Management Service is running. Learn more about the alert here.
Cause 2: Insufficient space in the database (SQL Server Express edition only)
This issue only affects databases hosted on SQL Server Express edition, where, depending on the version, the maximum database size (MDF file) is typically 10 GB (older versions) or up to 50 GB (SQL Server 2025 Express and newer. Learn how to upgrade to 2025 version here).
Safetica requires at least 30% of free space in the Safetica database before updates. Without enough free space in the database, the update will fail.
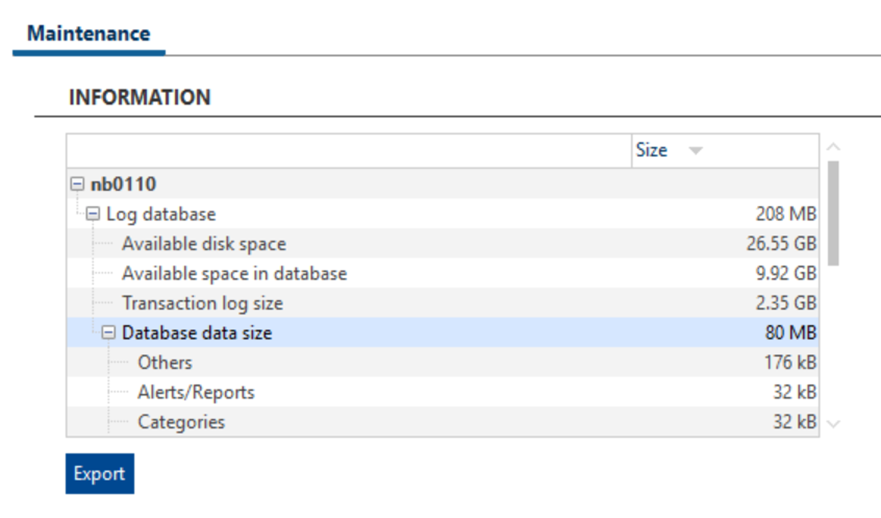
Check the size of your Safetica database in Safetica Maintenance Console:
- Go to Maintenance > Database management > Maintenance tab.
- There you can see available disk space, the size of data in the database, transaction log size, and available space in the database. You can also check which features generate high quantities of logs.

Solution for insufficient space in your database
If you do not have enough space in your database, perform these steps:
1. Stop Safetica services
If they are running, you can find them and stop them in Windows Services (services.msc).
If you are using Safetica version 11, stop:
- Safetica Management Service
- Safetica Service
If you are upgrading from Safetica version 10 to version 11, stop:
- Safetica Management Service
- WebSafetica
2. Run maintenance task:
If you are upgrading from Safetica version 10 to version 11, run the Prepare for update task from Safetica Management Console > Maintenance > Database management > Tasks tab > and in the Type of task drop-down, choose Prepare for update.
If you are using Safetica version 11, run the maintenance task in SQL Server Management Studio (SSMS):
a. Click New Query.b. Enter:
USE [safetica_data]
GO
EXEC [Archivation].[PerformMaintenance]
GO
c. Click Execute.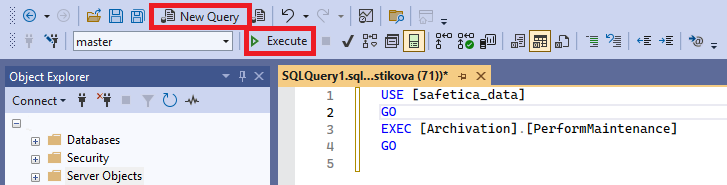
Verify free space again: After performing these steps, check the free space in the database. Ensure that at least 30 % of the total database capacity (or roughly 3 GB) is free before attempting the update.
Do not forget to activate Safetica Services again.
Optional: Set up alert
To avoid similar issues in the future, you can set up alert:
- Database size is near the maintenance limit: This alert notifies you when free space in the database drops below 30%. Learn more about the alert here.
When to contact Safetica Partner or Safetica Support
If the update continues to fail after trying all solutions above, contact your Safetica Partner or Safetica Support. Provide the following information:
- Your Customer ID.
- Current Safetica version and target update version.
- Server operating system version.
- SQL Server edition (Express/Standard/Enterprise) and version.
- Free disk space and database space after maintenance.
- Logs from Safetica Server – copy file C:\ProgramData\STEventService\DebugSEE.db to your desktop and from there send it to us.
- Error messages from:
- Safetica Maintenance Console
- SQL Server logs.