Protect your sensitive data and adjust data flow in your company.
Policies in Safetica NXT follow this evaluation system.
Compatible web browsers, email clients, instant messengers, remote transfer apps, and clouds are listed here.
A comparison of features supported on macOS and Windows devices is listed here.
In this article, you will learn:
- How to create a policy from scratch
- How to create a policy from an event
- How to disable or delete a policy
- Where to find how users were affected
How to create a policy from scratch
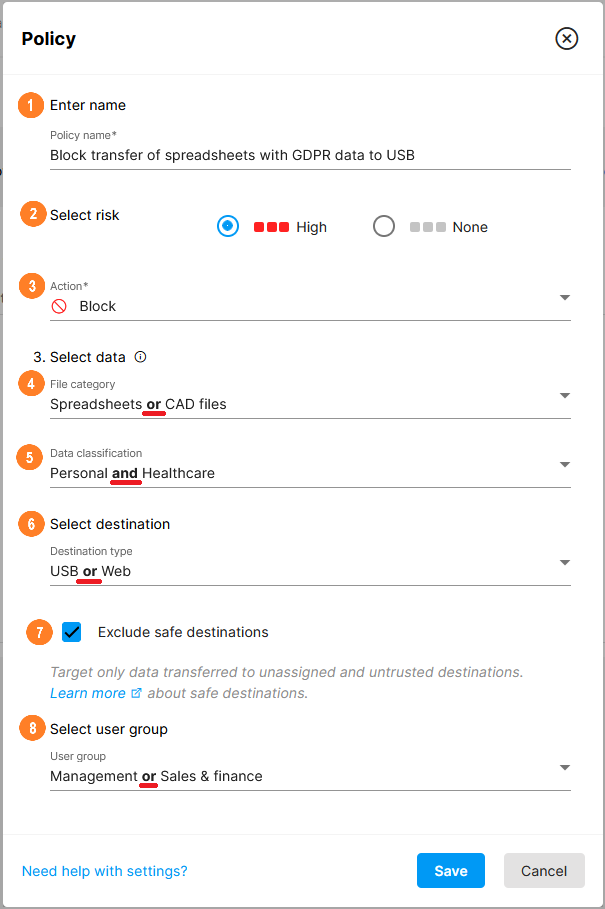
Go to Data security > Policies and click Add policy.
For every policy, you need to specify:
![]() Its name
Its name
![]() Whether the events that violate the policy are considered risky or not.
Whether the events that violate the policy are considered risky or not.
![]() What action will be taken on the device when the policy is violated:
What action will be taken on the device when the policy is violated:
-
- Log – the policy silently logs activities that violate it.
-
- Notify – the user is notified that their activities violate a policy. They can decide whether to finish the activity or not. If they perform the activity, it is logged.
- Block – activities that violate a policy are completely blocked and logged.
Safetica does not log screen capture, delete, create, rename, or copy/move within one physical storage (unless the destination is a cloud folder).
![]() The file category that will be targeted by this policy.
The file category that will be targeted by this policy.
It is not possible to analyze content in encrypted or password-protected files. To protect such files, create a general policy focused on the desired file type (e.g. a policy that targets all .zip files).
![]() One or more available data classifications (learn how to create data classifications here) – only files containing specified sensitive content will be affected. Disabled data classifications do not show up in policies.
One or more available data classifications (learn how to create data classifications here) – only files containing specified sensitive content will be affected. Disabled data classifications do not show up in policies.
If you leave the File category and the Data classification empty, the policy will apply to all file transfers to the specified destination types (e.g. to all data sent via email, all data uploaded to the web, all data copied to external devices, etc).
Such general policies are great for setting general limitations of what is allowed and what is not.
![]() Choose the location to which the file is transferred
Choose the location to which the file is transferred
For Email, Safetica NXT analyses sensitive content in the bodies of emails sent from supported desktop email clients.
![]() For Destination types: USB, Email, or Web, you can choose whether you want to apply the policy only to destinations considered safe in your company, or to untrusted or unassigned destinations. You can set/edit which destinations are safe or untrusted in the Destinations section.
For Destination types: USB, Email, or Web, you can choose whether you want to apply the policy only to destinations considered safe in your company, or to untrusted or unassigned destinations. You can set/edit which destinations are safe or untrusted in the Destinations section.
![]() What user groups will the policy apply to
What user groups will the policy apply to
Choose one or more user groups that you previously created in Settings > User groups. The policy will then be applied only to users from that particular group instead of globally.
Deleting a user group will automatically delete all policies in which it was used.
A policy is applied, when ALL its sections are matched (AND relationship between sections). If they are not matched, the evaluation continues with lower-priority policies.
How to create a policy from an event
You can use an already detected event as a template to create a new policy.
- Go to Data Security and click the
 icon in the Risk column.
 - Select Add new policy. The window for policy creation appears. Some sections will be filled in automatically based on the event.
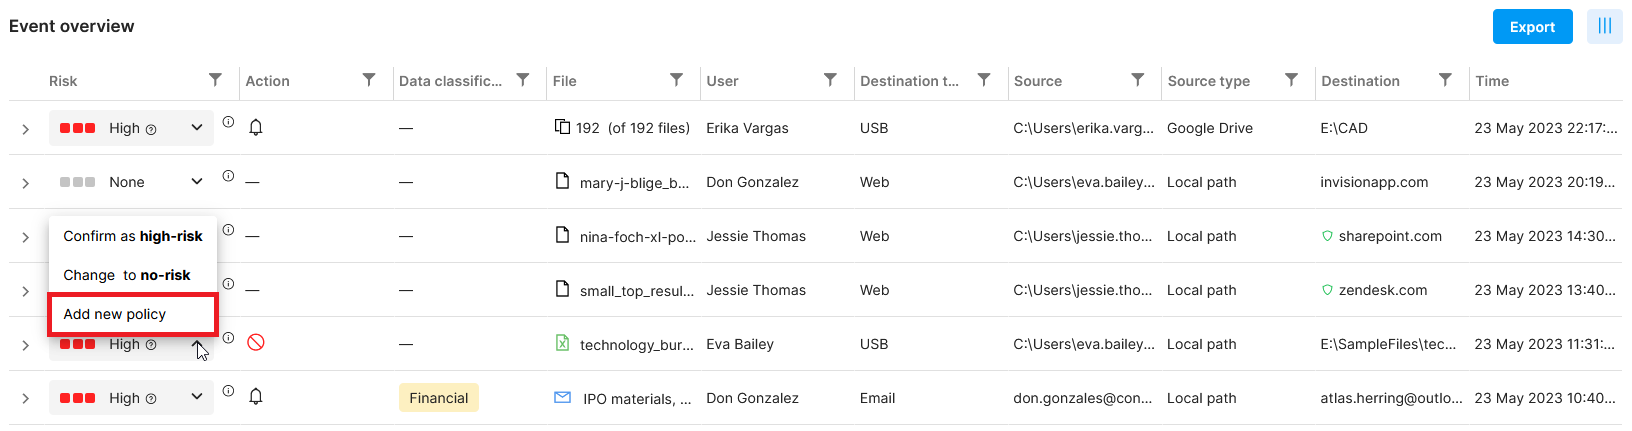
The newly created policy appears at the top of the Policy overview table, so it has the highest priority and takes precedence before all other policies.
The feature is not available for aggregated events.
How to disable or delete a policy
To disable a policy, go to Protection > Policy overview table and disable the toggle on the left.
Disabled policies are skipped during evaluation.
To delete a policy, go to Protection > Policy overview table, click  on the right, and then click Delete.

Where to find how users were affected
To see whether an event was logged, blocked, or the user was notified, go to Data security and look into the Action column.

Want to learn more? Read next:
Safetica NXT Data security - Policies
Safetica NXT Data security - Overview
How to use custom filters in Safetica NXT