Information in this article applies to Safetica ONE 10 or older.
Supported file formats for user-based classification are: .docx, .xlsx, .pptx, .pdf, .xlsm.
Please note that user-based classification is only available in Safetica Protection and Safetica Enterprise.
- How to enable user-based classification for selected users:
User-based classification can be enabled for selected users and endpoints. You can also control whether they are allowed to reclassify files freely, or only select stricter classification levels.
- Open Safetica Management Console and go to Maintenance > Endpoint settings > User-based data classification.
- In the user tree, select the users or endpoints, for which to enable user-based classification.
- Set User-based data classification to Enabled. This allows specified users to see the Classify file option in their right-click context menu. If you choose Disabled, the Classify file option will be hidden.
- If you want to allow users to change document classification to a less strict one, set Permission to downgrade classification to Enabled. If you choose Disabled, users will only be allowed to increase the strictness of document classification.
- Save your settings by clicking [✔].
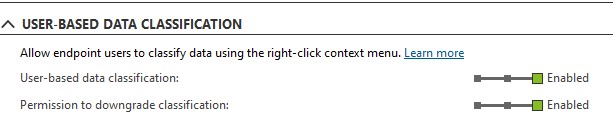
Note: The Permission to downgrade classification can be set independently of the User-based data classification option. You can enable user-based classification for a group of users, and at the same time enable Permission to downgrade classification to only a subset of this group.
- How to classify files as a user:
To classify a file, the user selects it and right-clicks it. When the context menu opens, the user will see the Classify file option. On mouse hover, they will see the available data categories they can choose from.
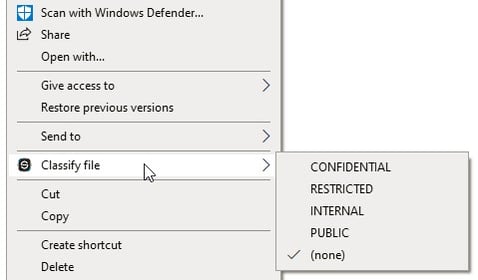
In Windows 11 context menu, Classify file can be found under Show more options:

If a file has no data category assigned, the (none) option is checked. This option disappears after classification has been assigned. Policies bound to the selected data category will then be applied to the file as well.
Categories in the context menu are listed in the same order as in Safetica Management Console. This can be changed in the Protection > Data categories table. The order should reflect the strictness of individual classification levels.
It is possible to select and classify several files at once. If an unsupported file format is selected, the Classify file option will not be displayed in the context menu.
- How to configure data categories to be displayed to users:
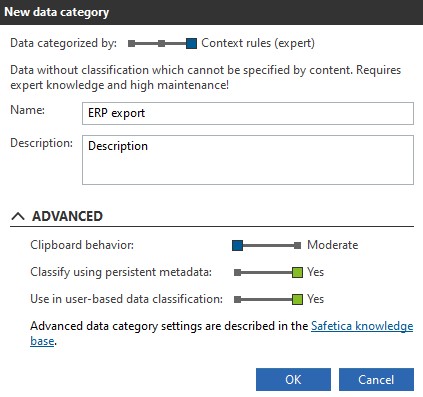
User-based data classification requires metadata-based data categories. To display a category in the right-click context menu:
- Open Safetica Management Console and go to Protection > Data categories.
- Click Edit next to the data category you want to display to users. The category must be context-based and use persistent metadata.
- In the Advanced options, enable Use in user-based data classification.
- Click [OK].
- Save your settings by clicking [✔].
- How to remove data classification from a file:
Users cannot remove the classification from files. To work around this, the recommended approach is to:
- Create a new data category (called e.g. Public) and do not assign it to any DLP policy.
- Place this category at the very bottom of the category list in the Protection > Data categories table.
When a user needs to remove the classification from a file, they can choose this “empty” category. The file will not be affected by any DLP policy but will remain trackable within DLP logs