![Logo landing page 232x64 with border.png]](https://support.safetica.com/hs-fs/hubfs/Marketing/Safetica_logo_/Logo%20landing%20page%20232x64%20with%20border.png?width=145&height=40&name=Logo%20landing%20page%20232x64%20with%20border.png)
Applies to: Safetica On-Prem
Product plans: On-Prem (see: Limits by plan)
Looking for the Safetica Platform version? See: Safetica Platform: How to register and delete admin accounts
Introduction
Safetica allows you to add admin accounts for the console and assign them permissions to view records and modify settings.
Safetica On-Prem supports three sign-in methods. This article covers option 1. For the others, follow the links below:
- Manually created account: Create an admin account, including the user name and password from scratch. Learn more below.
- Single sign-on (SSO): Learn more here.
- Active Directory security group: Learn more here.
✍️You can learn more about the Accounts and permissions section (including how to work with permissions) in this video.
Permissions to add and delete admin accounts
Managing admin accounts and their roles is available only to Safetica admins who have the Settings and configuration permission.
How to create a new admin account from scratch
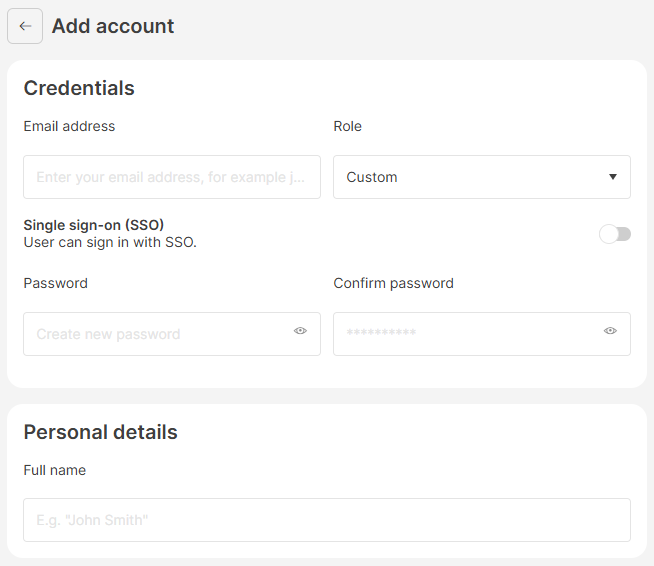
In Safetica On-prem, to create a new account from scratch:
1. Go to Settings > Accounts and Permissions and click Add account.2. Enter the Email address and Password the new admin will use to sign in.
✍️Password changes: Admins with the Settings and configuration permission can reset the password for any account. Other admins can only change their own password by clicking their avatar in the top right corner. Learn more here.
3. Select the Role for the admin account (you can choose from Admin, Auditor, or Custom). Learn more about roles here.
✍️ The Admin and Auditor roles are predefined: their permissions are fixed and can't be edited. When you need more granular control, choose Custom.
4. Enter the admin's Full name. This user-friendly display name appears throughout the console for easy identification.
5. If you selected the Custom role, the full list of permissions expands, and you can set each one individually. Learn more about permissions here.
6. Click Save.
More about roles
Account roles let you control what each Safetica admin account is allowed to do. You can configure individual permissions manually for the account, or you can assign one of two predefined roles. Learn more about roles here.
More about permissions
Permissions control what each admin can see and change in the Safetica console. You set them when registering an account and can update them at any time. Learn more about permissions here.
How to delete an admin account
- Go to Settings > Accounts and permissions.
- Click the account you want to delete.
- Click the Delete button at the bottom of the page.