💻On-premises Safetica: How to create and manage database archives in Safetica console
Learn how to archive records from Safetica database and manage archives in Safetica console.
❗Archives are only available in Safetica hosted on-premises. In the cloud-hosted Safetica, the data is stored in Azure and does not require archiving.
In this article, you will learn more about:
- How to attach an archive
- How to browse an attached archive
- How to update an outdated archive
- How to detach an archive
- Archive statuses
- FAQ
Archive permissions
Permissions for archive management are as follows:
- Manage archives: Only Safetica admins with the Settings and configuration permission can access the Settings > Archives section in the Safetica console. The permission can be enabled or disabled in Settings > Accounts and permissions.

How to create a database archive
During archive creation, older records from the Safetica database are archived and then deleted, which helps to free up space on the Safetica server. Archiving is a one-time, scheduled task and does not recur automatically. Each archive creation must be scheduled manually.
❗During archive creation, devices may be temporarily disconnected from the Safetica server. Once archiving is complete, the connection is immediately re-established.
To schedule archive creation:
- Go to Settings> Archives in the Safetica console.
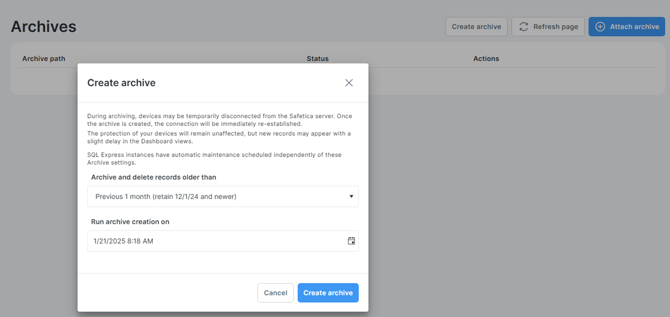
- Click the Create archive button.
- Archive and delete records older than: Set the retention period (previous 1, 3, 6, or 12 months) from the start of the current month. Older records are archived and deleted from Safetica console, but the created archive can still be attached and browsed. Newer records are retained.
- Run archive creation on: Specify when exactly you want to create the archive (the date and time).
- Click the Create archive button.
- The archive and its status will appear in the list of archives.
- Once the archive creation is run and finished, the archive’s status changes to Ready, and it will be available for browsing.
✍️When you update Safetica server to a newer version, all Ready archives will become Outdated. Learn how to update an outdated archive here.
Example: On June 20, the admin decides to schedule archive creation. They select to archive and delete all records older than the previous 1 month. They schedule the archive creation to run on July 5. What records will be archived and deleted from the database?
Since the admin created the archiving task on June 20, all records older than May 1 will be archived and deleted. Records from May 1 and newer will be retained.
How to cancel scheduled archive creation?
Scheduled archive creation (status: Scheduled) can be canceled by clicking the Cancel button. However, archive creation already in progress (status: Creating) cannot be canceled.
What to do when archive creation fails or cannot be run?
Re-run the creation: If archive creation fails or can't be run at the given time, the archive status will change to Failed, and you can manually re-run the creation process by clicking the Re-run button. (Note: The execution window for archive creation is 10 minutes. For example, if archive creation is scheduled for midnight and the server comes online by 0:09, the archive will be created as planned. However, if the server comes online at 0:10 or later, the archive creation will fail.)
Delete the failed archive: You can also delete Failed archives by clicking the Delete button. The archive file will be permanently deleted from the server. This action cannot be undone.
Where to find the created archive?
Archives are stored at the default location of your SQL server. This location cannot be changed. You can see the archive path in the Settings > Archives table.
How to attach an archive
❗For Safetica ONE archives: When attaching an archive from a different location than the one used in Safetica ONE (e.g., if you copied the archive to a new location), begin by manually attaching it in SQL Server Management Studio. Afterward, follow the steps below to complete the attachment in Safetica console.
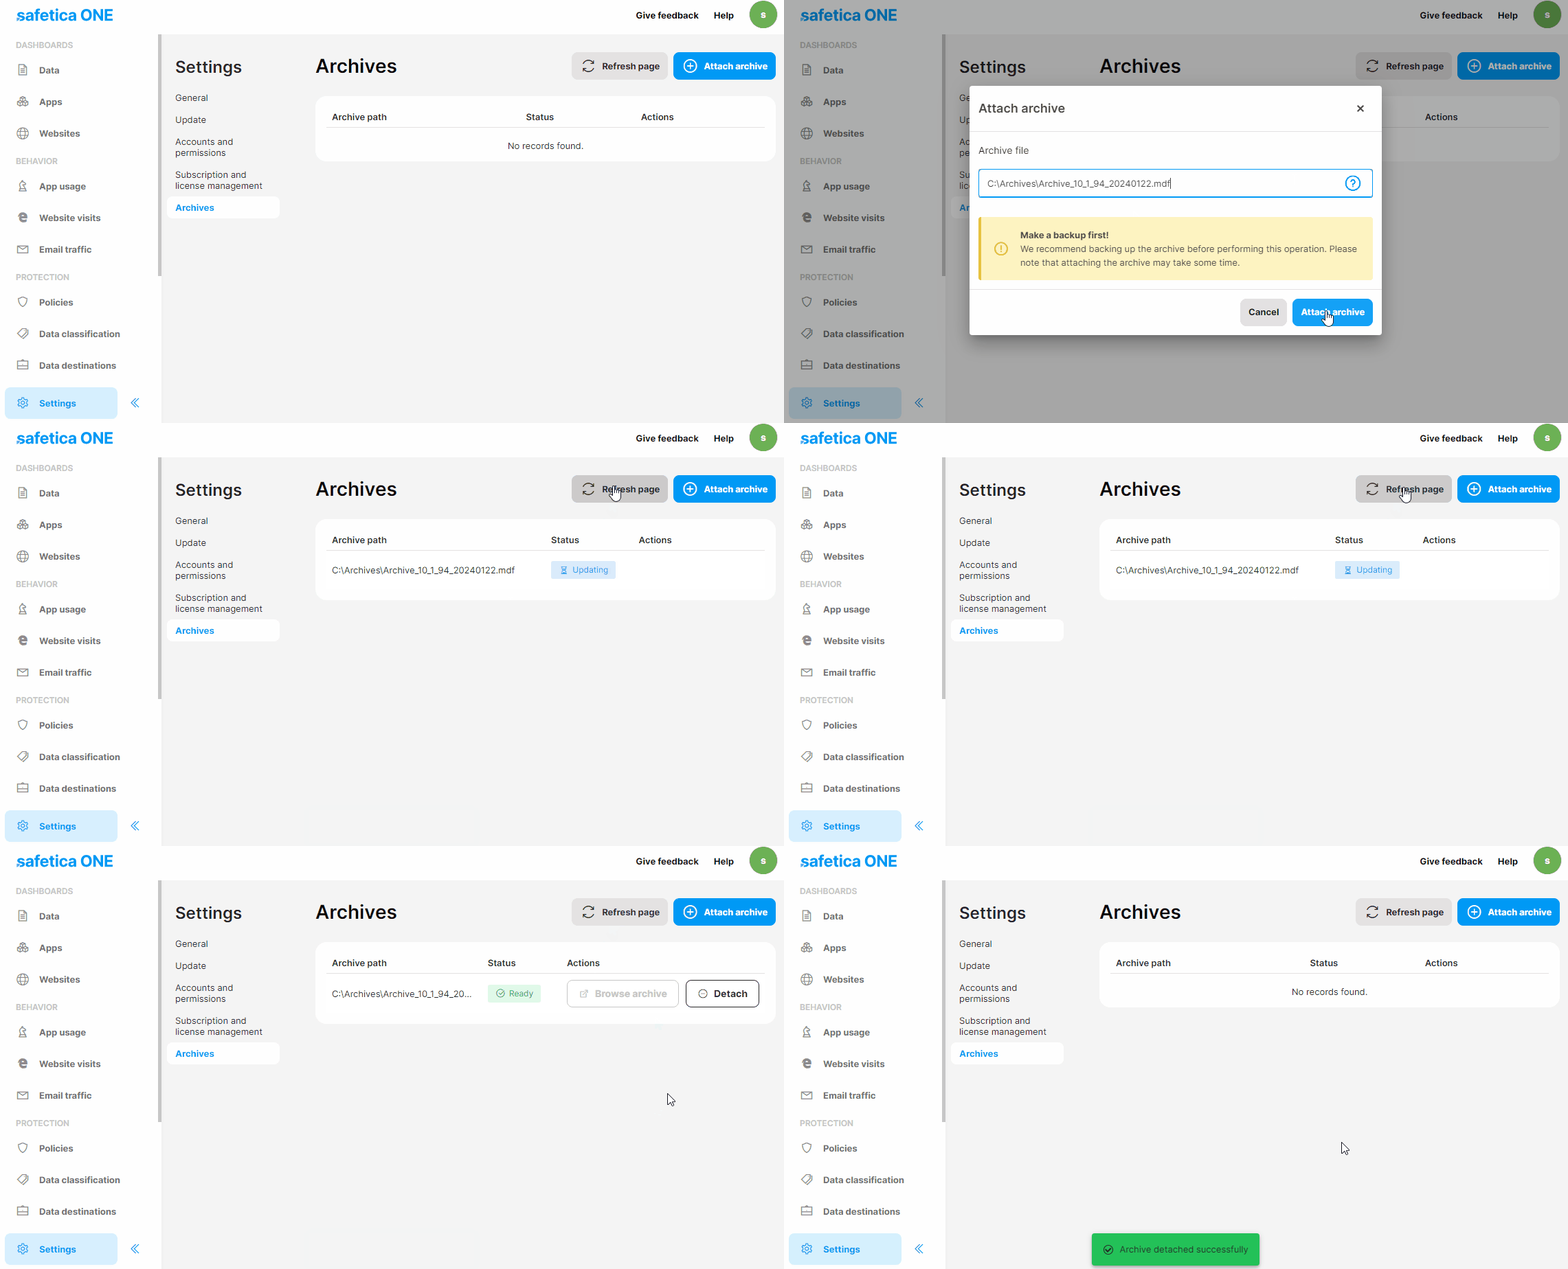
1. Go to Settings > Archives in Safetica console.
2. Click the Attach archive button.
3. Fill in the path to the archive, which must be accessible by MS SQL server.
❗For Safetica ONE archives: Safetica ONE archives will be automatically updated to the current Safetica version. Back up the archive before proceeding.
4. Click Attach archive.
5. The archive will appear in the list of archives and will start Initializing.
❗For new Safetica archives: If you have attached an archive created in new Safetica, it might need to be updated to the newest Safetica server version. Back up the archive before updating. Learn how to update an archive here.
6. Once all updates are complete, the status changes to Ready, and the archive becomes available for browsing.
How to browse an attached archive
You can browse attached archives with the Ready status:
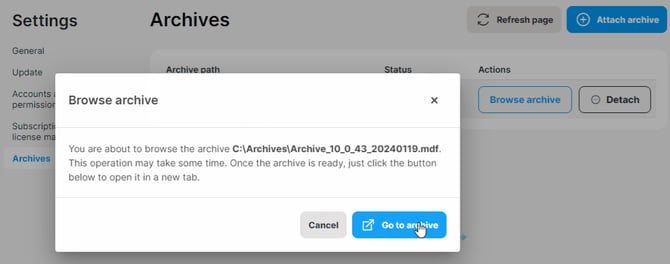
- Go to Settings > Archives in Safetica console.
- Click Browse archive and then Go to archive.
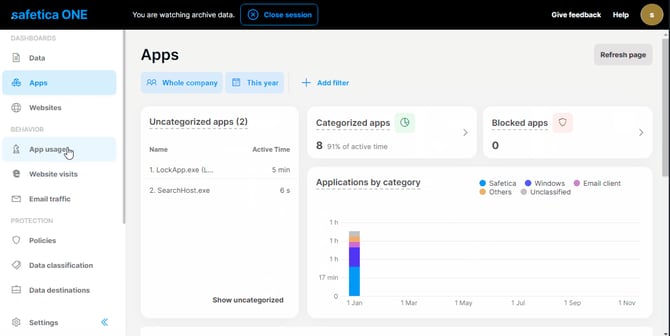
- A new browser tab with a new URL will open. There, you can browse the archived data separately from live data.
- While browsing the archive, the interface will indicate that you are viewing archived data.

✍️Multiple admins can browse the same archive at the same time. They can view records in the Dashboards and Behavior sections but cannot access or change settings.
How to update an outdated archive
After updating your Safetica server to a newer version, all Ready archives will become Outdated. Follow these steps to update them to an up-to-date version:
- Go to Settings > Archives in Safetica console.
- Click the Update button. Back up the archive before proceeding.
- Click Update archive.
- Wait for the archive to finish updating. Its status will change to Ready once finished, and the archive will again be available for browsing.
How to detach an archive
To disconnect an archive from Safetica and remove it from the list of archives:
- Go to Settings > Archives in Safetica console.
- Click the Detach button.
- Confirm that you really want to detach the archive.
- The archive will be removed from the list of archives.
✍️Detaching an archive only removes it from the list of archives. The archive file remains stored in its original location. You can choose to keep it or manually delete it.
Archive stauses
Below are the possible archive statuses in Safetica:
- Creation scheduled: Archive creation is scheduled for a specific date and time.
- Creating: Archive creation is in progress.
- Creation failed: Archive could not be created. You can manually re-run archive creation by clicking the Re-run button.
- Attaching failed: An error occurred during initialization or update.
- Initializing: Archive is being attached or updated to version 10.4., typically after the admin clicks Attach.
- Updating: Archive is being updated to the latest version, typically after the admin clicks Update or right after Initializing.
- Ready: Archive is ready to be browsed by the admin, buttons Browse archive and Detach are enabled.
- Not accessible: Archive was Ready, but is currently not available for browsing. It is probably not attached or not accessible by MS SQL.
- Outdated: All Ready archives become Outdated after a Safetica server update. Follow these steps to update them to an up-to-date version.
FAQ
Q: Which types of SQL servers do archives support? What SQL server editions are compatible with archives?
A: Archives support both the Microsoft SQL Server Express and the Microsoft SQL Server.
Q: What are the limitations of Microsoft SQL Express Edition regarding database size and log retention?
A: Microsoft SQL Express Edition is well-suited for smaller companies but comes with some limitations, including a maximum size of 10 GB for each relational database.
By default, when 80% of this size limit is reached (approximately 8 GB of logs), the system automatically deletes the oldest logs until the database is less than 70% full. As a result, data retention in this case is not time-based but instead depends on the size of the stored logs.
Q: Is it possible to create archives automatically? Can I schedule automatic recurring archiving?
A: For now, archiving is a one-time, scheduled task and does not recur automatically. Recurring archiving is in our roadmap to be added in the future.


