![Logo landing page 232x64 with border.png]](https://support.safetica.com/hs-fs/hubfs/Marketing/Safetica_logo_/Logo%20landing%20page%20232x64%20with%20border.png?width=145&height=40&name=Logo%20landing%20page%20232x64%20with%20border.png)
Product plans: Premium | Enterprise | On-Prem (see: Limits by plan)
Introduction
The following guides have been tested by Safetica. In each case, the Safetica side is the same: paste the webhook URL, and add a header only if the receiving tool needs one to authenticate. Never add a Content-Type header. Most of the work happens in the receiving tool.
Jira: create an issue from a Safetica insight
This setup creates a Jira issue automatically for each event.
In Jira:
- Go to your space and select Open space settings > Automation.
- Click Create flow, then Create from scratch.
- Change the first trigger to Incoming webhook. At this step, you can also add conditions if you want the flow to act only on certain webhooks.
- Click Add action and choose what should happen, for example Create work item or Create incident.
- Specify which space the item should be created in and which issue type to use.
- Fill in the summary and description, using smart values (Jira's placeholders for event data) to insert parts of the event. For example:
Summary:

Description:
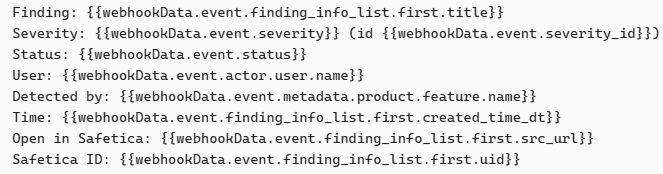
7. Name your flow, then save and enable it. The webhook URL is only generated at this point.
8. Once saved, copy the webhook URL and generate a secret.
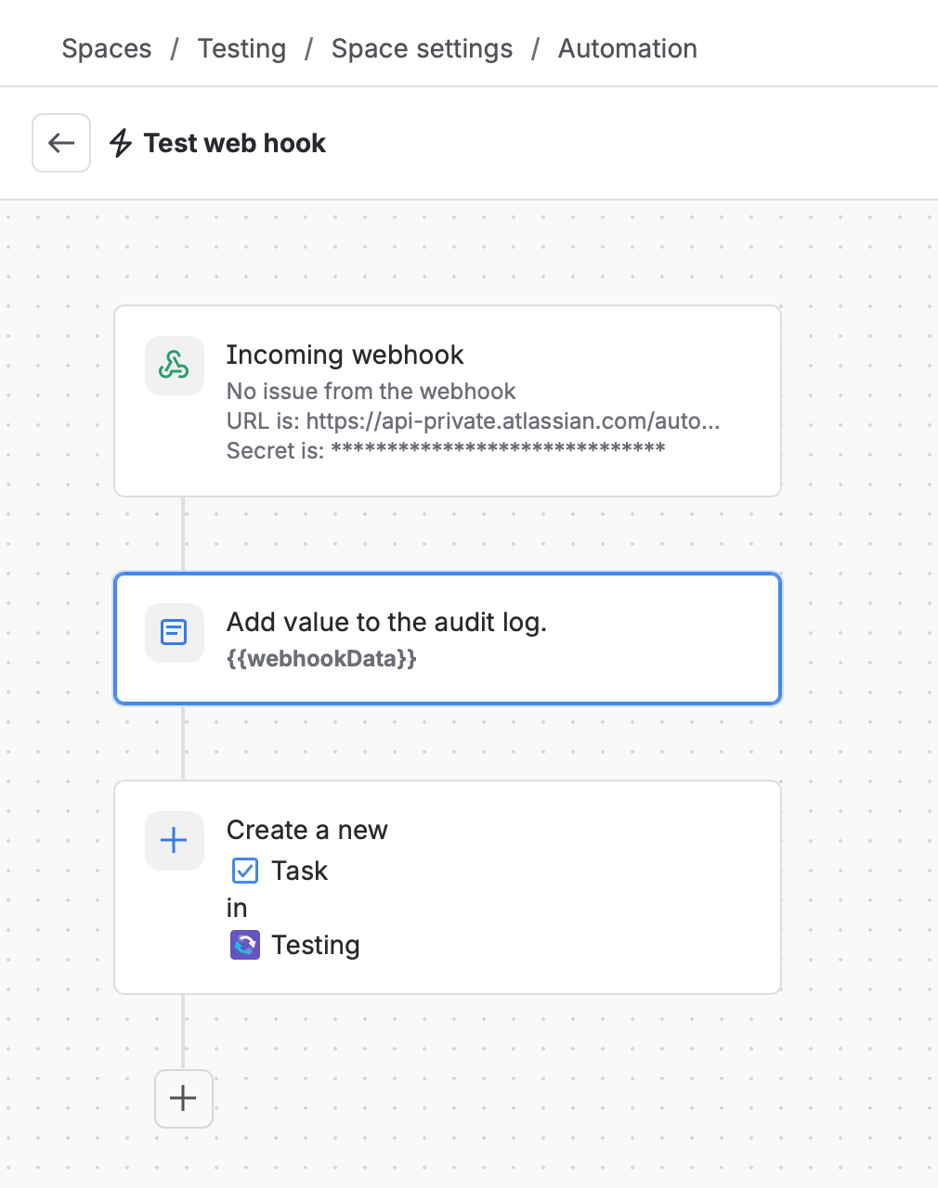
✍️ See the real event data before you finalize your smart values. If you are not sure which smart values to use, or which fields a particular insight contains, add a Log action step before your Create action and set the log message to . Your flow then looks like this:
Incoming webhook -> Log -> Create work item
Every event's full JSON is written to the flow's audit log, so you can see exactly what Safetica sent and pick the right paths. Leave the step in place while you build, then remove it once your mapping is right. See Jira automation actions, including the Log action.
In Safetica:
- Paste the webhook URL into the Webhook URL field of the webhook integration.
- Add the secret as a header:
a. Header:X-Automation-Webhook-Token
b. Value: your generated secret - Click the lock icon to make the secret private. Do not add any other header. In particular, do not add
Content-Type. - Click Add.
- Choose whether to send insights only, or admin trail records as well.
- Click Save, then use Test connection to check the setup. Once the test passes, you are ready to receive data.
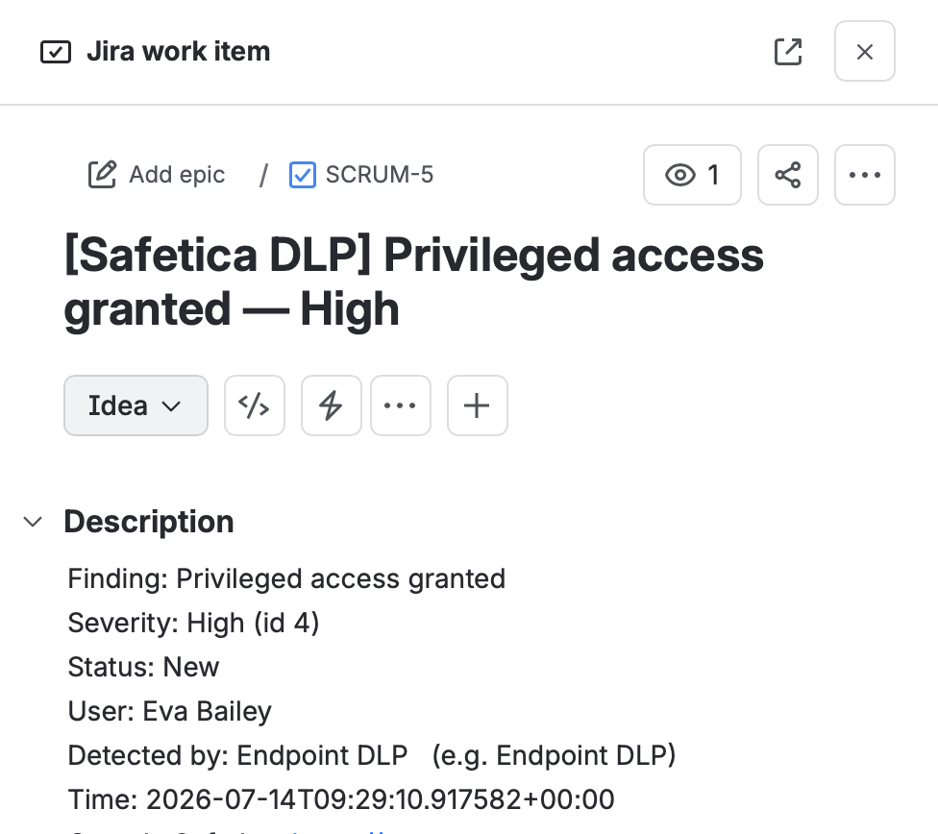
Check your smart values against both streams. Insights and admin trail records have slightly different JSON content, and the two insight classes differ from each other as well. The example above reads finding_info_list, which covers most insights but not high or medium-risk or data policy violation events; those use finding_info instead. To cover both, write the two smart values back to back:

Only one of them exists in any given event, so the other renders as nothing. See Working with the event data here.
Troubleshooting:
| Problem | Solution |
|---|---|
| There is no webhook URL to copy | The flow has not been saved and enabled yet. Jira only generates the URL at that point. |
| Connection test fails | Remove the Content-Type header. The X-Automation-Webhook-Token header should be the only one. This is the most common cause of failure. |
| HTTP 400 error | The secret is missing. Add it as the X-Automation-Webhook-Token header. |
| Test succeeds but nothing is created | Jira returns success even if the flow is disabled. Check the flow's audit log to see whether it actually ran. |
| Nothing in the audit log | The flow is not enabled, or the URL was cut off when pasted. Webhook URLs are long, so copy the whole value. |
| Some fields in the created item are empty | The smart value path does not match that event type, most often finding_info_list on an event that uses finding_info. Add a Log action step with |
More details from Atlassian: Configure the incoming webhook trigger, Automation actions, including the Log action, and Check the incoming webhook trigger is correct.
Zapier
Zapier connects Safetica to any application it supports.
- In Zapier, click Create and select Zap workflows. You can either use Zapier's Copilot to help set it up, or configure the steps yourself as below.
- Set the first trigger to Webhooks, with the trigger event Catch hook.
- Leave Pick off a child key blank.
- Move to the third phase, Test. Your webhook URL is shown here.
- Copy the URL and paste it into the Safetica webhook integration. No header or value is needed; the URL on its own is enough.
- Click Save, then Test connection. Zapier now catches the hook.
- Add the next step and choose the action you want, depending on what you would like to do with the data. Zapier connects to thousands of applications; browse them at zapier.com/apps.
- Map the event fields into your chosen action, then publish the Zap workflow and switch it on.
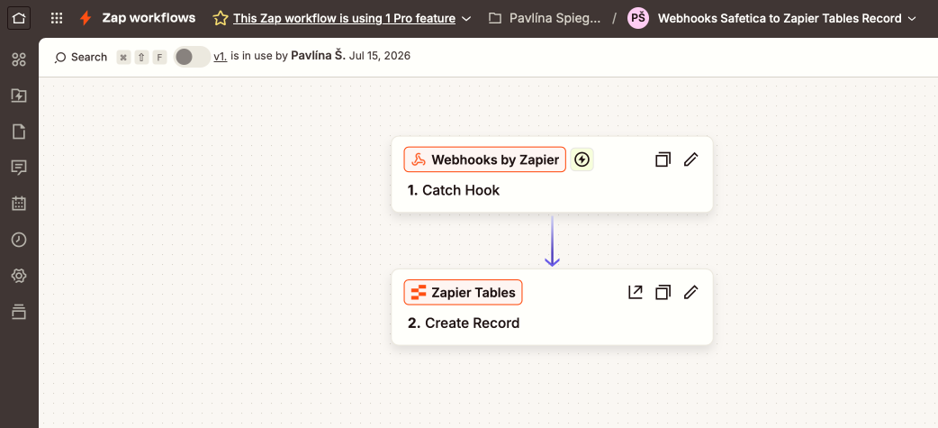
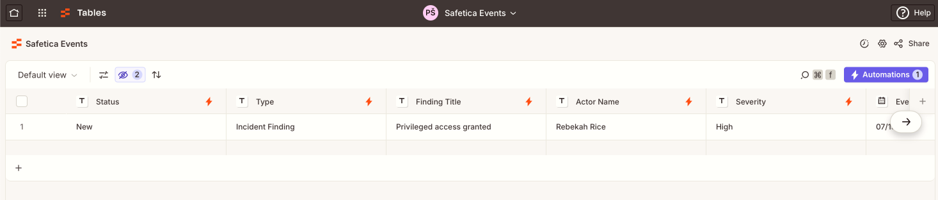
✍️ Before you map fields, trigger a real Safetica insight and run Test trigger again. The connection test sends only a small test request, so on its own it does not show you the full set of event fields.
Troubleshooting:
| Problem | Solution |
|---|---|
| Connection test fails | Remove the Content-Type header. |
| No data found when testing the trigger | Trigger a real event, then test again. |
| Fields are missing when mapping | Re-run Test trigger after a real event has arrived. |
| The webhook option is unavailable | Webhooks by Zapier is a paid Zapier feature. |
More details from Zapier: Trigger Zaps from webhooks.
Make
Make routes events visually and can send them to several destinations at once.
- In Make, go to Scenarios and click + Create scenario. You can either build it yourself as below, or use Make's AI assistant (Build with Maia).
- Click Add (or the + icon) and select Webhooks > Custom webhook (triggers when the webhook receives data).
- Click Create webhook and give it a name. Generating an API key is optional (see the note below).
- Save it. Your webhook URL is now shown.
- Copy the URL, paste it into the Safetica webhook integration, and click Test connection.
- Click Save in Safetica. You are now receiving data.
- Continue building the scenario with whichever action you want to automate, mapping the event fields into it.
✍️ Optional API key. Make offers to generate an API key when you create the webhook. It is not required; the webhook URL alone works. If you do generate one, follow Make's instructions for how it must be sent, and add it as a header in Safetica. The setup described here was tested without an API key.
✍️ Seeing the field names. If the fields you want are not offered when mapping, open the webhook module and click Redetermine data structure, then trigger a real Safetica insight while it listens. Make then learns the full structure of a real event, which the small connection test does not show.
Troubleshooting:
| Problem | Solution |
|---|---|
| Connection test fails | Remove the Content-Type header. |
| No fields available when mapping | Click Redetermine data structure and send a real event while Make is listening. |
| Data arrives but the actions never run | The scenario is switched off. Turn it on and set scheduling to Immediately as data arrives. |
| A list field returns nothing | Make numbers list items from 1. Use [1] for the first item. |
More details from Make: Setting up the Custom webhook module and Webhooks overview.
Microsoft Power Automate
Power Automate brings Safetica events into Microsoft 365, ready for Teams, SharePoint, or Outlook. It requires a Power Automate plan that includes premium connectors.
- Click + Create > Instant cloud flow. Name it, and choose the trigger When an HTTP request is received.
- Leave the Request Body JSON Schema box empty. Filling it in makes the trigger reject Safetica's connection test.
- Set Who can trigger the flow? to Anyone. If you cannot see this setting, switch to the classic designer, where it appears on the trigger card.
- Leave the trigger as it is and add an action. This can be anything Power Automate offers, and a flow cannot be saved without one. To post to Microsoft Teams, see the guide below.
- In the action, insert event values using expressions such as
@{triggerBody()?['event']?['severity']}. You can type these directly into a text field. - Save the flow.
- Click the trigger, copy the HTTP POST URL, and paste it into the Safetica webhook integration. The URL only appears after the first save, and only in the flow designer, not on the flow details page.
- No headers are needed; the token in the URL authenticates the request. Click Save, then Test connection.
- Trigger a real event and check the flow's run history.
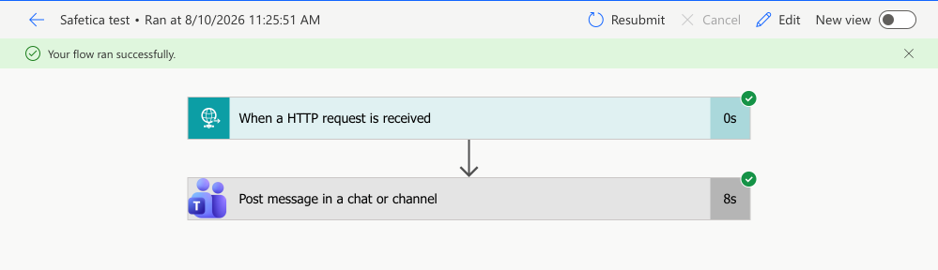
❗ The generated URL contains an access token. Treat it as a password and do not share it.
Troubleshooting:
| Problem | Solution |
|---|---|
Error: DirectApiAuthorizationRequired |
Set Who can trigger the flow? to Anyone. |
| That setting is not visible | The new designer hides it. Switch to the classic designer. |
Error: TriggerInputSchemaMismatch |
A JSON schema is configured and the test request does not match it. Clear the schema box. |
| The webhook URL cannot be found | Save the flow first, then open the trigger in the designer. The URL is not shown on the flow details page. |
| Test succeeds but no run appears | The URL was cut off when pasted. Copy it again using the copy button. |
More details from Microsoft: Who can trigger the flow: authentication for HTTP request triggers and Regenerate the access token.
Microsoft Teams
This setup posts a message to a Teams channel for each Safetica insight.
Safetica cannot post to Teams directly, because Teams expects a specific message format. Microsoft also retired the classic Teams Incoming Webhook connector in 2026, so a webhook URL pasted into a channel no longer works. Use one of these routes instead.
Via Power Automate:
- Set up the Power Automate flow as described above, through step 3.
- As the action, select Post message in a chat or channel.
- Configure whether to post as a bot or as a user, then choose the channel and the remaining details.
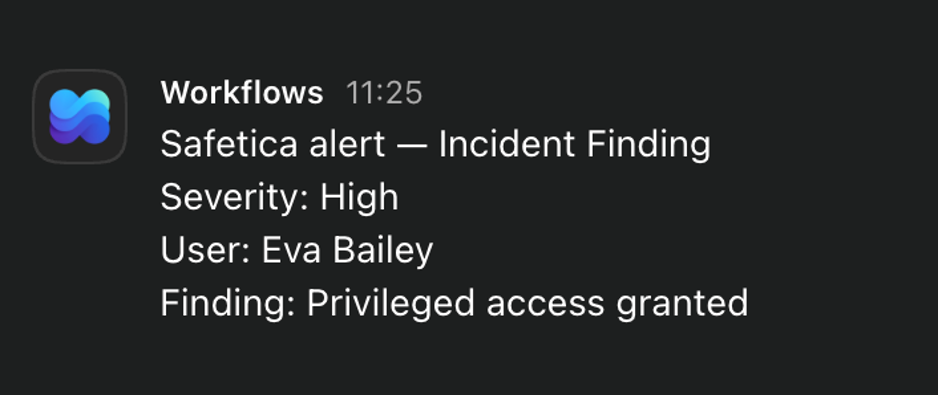
- For the message, insert the event values you want. For example:
Safetica alert - @{triggerBody()?['event']?['class_name']}
Severity: @{triggerBody()?['event']?['severity']}
User: @{triggerBody()?['event']?['actor']?['user']?['name']}
Finding: @{first(triggerBody()?['event']?['finding_info_list'])?['title']}
5. Save the flow, then copy the URL from the first step into Safetica and test the connection.
You can type the expressions straight into the message field; Power Automate resolves them when the flow runs.
Via Make or Zapier (simpler, and does not require a Power Automate plan):
- Set up Make or Zapier as described above.
- Add the Microsoft Teams action and sign in.
- Choose the team and channel, then map the event details into the message.
Troubleshooting:
| Problem | Solution |
|---|---|
| The message posts but some fields are empty | The field path does not match that event type. The example above reads finding_info_list, which is empty on high or medium-risk and data policy violation insights; those use finding_info. See Working with the event data here. |
The message shows raw text such as @{...} |
The expression was not recognized. Check the syntax, or re-enter it through the expression editor. |
| The Teams step fails | The Teams connection is not authorized, or the team and channel were not selected. |
| An old Teams webhook URL stopped working | Classic connectors were retired. Rebuild the flow using Workflows / Power Automate, Make, or Zapier. |
More details from Microsoft: Send a message in Teams using Power Automate and Retirement of Microsoft 365 connectors in Teams.
n8n
n8n is an open-source option, available as a cloud service or self-hosted.
- In n8n, click + and select New workflow.
- As the first step, select Webhook.
- Two URLs appear immediately: a Test URL and a Production URL. Select Production URL.
- Change the Method from GET to POST.
- Copy the Production URL, then publish the workflow. The workflow has to be published before you can test it from Safetica.
- Paste the URL into the Safetica webhook integration, click Save, and click Test connection. n8n can now receive the webhook.
- Go back to the workflow and add your action, configured to whatever you need.
- Click the Executions tab to see the events as they arrive.
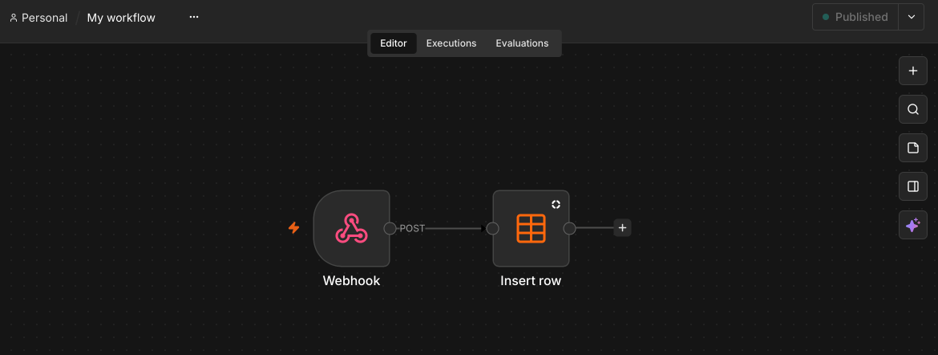
Example: To collect Safetica events in a table, create a data table in n8n first (outside the workflow), then add an Insert row step to the workflow, pointing at that table with the event fields mapped to its columns.

Troubleshooting:
| Problem | Solution |
|---|---|
| Error: the webhook is not registered | You used the Test URL, which only accepts one call after you click Execute workflow. Use the Production URL and make sure the workflow is published. |
| Nothing arrives, no error | The method is still set to GET. Safetica sends a POST, so change the method on the Webhook node. |
| Connection test fails | Remove the Content-Type header. |
| All fields are empty | Field paths must begin $json.body.event. |
| Error: unexpected object input | Switch column mapping from automatic to manual and map each column to a single value. |
| Some events cause errors | Not every event type contains every field. Use optional chaining, for example finding_info_list?.[0]?.title. |
| Self-hosted n8n receives nothing | Safetica connects from the internet. Your instance must be publicly reachable and must allow Safetica's outbound IP. |
More details from n8n: Webhook node, Webhook node: common issues, and Data tables.