How OCR works
Enable and set up OCR to detect sensitive content in images, photos, and scanned documents. Learn about the limitations of OCR, how to enable/disable OCR globally or for specific devices, and how to select OCR character sets.
In this article, you will learn:
How OCR works in Safetica
Safetica analyzes the content in selected file types. With OCR, you can expand the scope to images, such as photos and scanned documents. OCR converts text in images into machine-encoded text. This is particularly useful for example to recognize text in documents that were optically scanned in a scanner machine. When Safetica converts the text from the image, standard sensitive content analysis is applied.
Our OCR supports the following image types: .png, .tiff, .jpg, .jpeg, .jpe, .bmp.
We can, however, extract images also from other file types, such as .pdf documents, presentation files, ebooks, etc. You can find the list of supported formats here.
❗Due to performance reasons, we only scan files that have at least 75% of pages covered by images. A “page covered by images” has images on at least 70% of its area.
✍️OCR is a global setting that applies to all devices.
OCR limitations
Safetica's OCR technology is primarily designed to extract sensitive content from scanned text documents. The scan quality is optimized to balance reasonable performance demands and the highest possible accuracy. Therefore, the technology may have difficulty processing certain types of text, such as:
- text blended with background
- low-quality images
- scattered words without a clear paragraph structure
- handwritten text
-
vector drawings in PDFs (Note: To differentiate a vector drawing from typical raster images, zoom in the image. If it does not blur, it is most probably a vector drawing.)
- and more.
❗Since OCR is a resource-intensive technology, if you plan to use it extensively, it might be necessary to adjust the minimum hardware requirements.
✍️As mentioned above, OCR is not bulletproof. We recommend testing its accuracy on sample documents and using it as a complement to other security measures. If you feel OCR does not work according to your expectations, please contact Safetica Support.
OCR in action
Want to see how to set up OCR? Watch the video below:
How to enable/disable OCR globally
To enable OCR for all devices in your company:
- In Safetica console, go to Data classification.
- Click Settings > Content analysis settings.
- You can enable/disable OCR for all devices via the OCR checkbox.
- Save your settings.
How to select an OCR character set
✍️OCR searches for characters that are present in a selected character set.
For this reason, there is only a limited number of character sets to choose from in Safetica console: Arab, Chinese (simplified), Chinese (traditional), Czech, English, French, German, Hebrew, Kazakh, Lithuanian, Mongolian, Polish, Portuguese (Brazil), Russian, Slovak, Spanish, Turkish, Ukrainian.
If your language is missing - then since OCR is not about the language itself, but about the characters in its character set - you simply select the character set closest to your language.
You can choose 2 different character sets to be detected by OCR, which may be useful for customers with multilingual environments. However, we do not recommend setting a secondary character set unless you need to analyze texts written in different alphabets (for example English and Chinese) since this will impact device performance. A document in German will be most likely correctly processed by English character set as both languages share the same alphabet.
✍️Setting a secondary character set can improve detection accuracy in multilingual environments. It is useful mainly for languages with different character sets, such as Cyrillic vs Latin vs Chinese alphabets.
Languages without special characters are a subset of languages with special characters. This means that if you set e.g. Czech or German as your primary character set, then setting English as a secondary character set is not necessary, since all the characters of English are already contained in Czech/German character sets.
How to activate/deactivate OCR for a specific device
❗This option is only available for Safetica hosted on-premises.
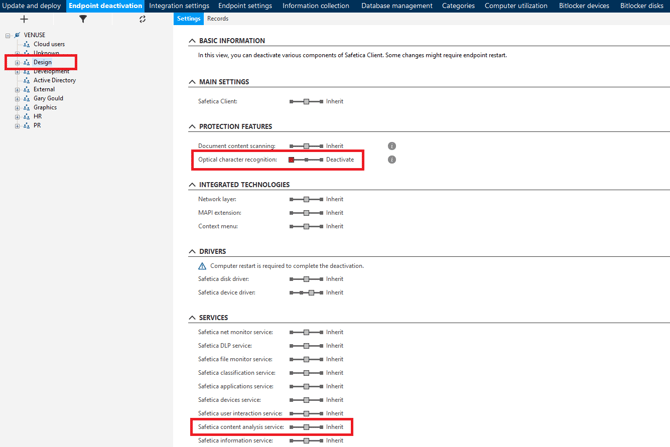
- Open the Safetica Maintenance Console and go to Maintenance > Endpoint deactivation.
- Select the device or group for whom you want to activate/deactivate OCR in the user tree.
- In the Protection features section, select the desired option with the Optical character recognition slider.
FAQ
Q: Which languages can Safetica recognize in documents?
A: Safetica's OCR feature can recognize the following character sets: Arab, Chinese (simplified), Chinese (traditional), Czech, English, French, German, Hebrew, Kazakh, Lithuanian, Mongolian, Polish, Portuguese (Brazil), Russian, Slovak, Spanish, Turkish, Ukrainian. Also, all languages that use these character sets will be recognized.
Q: Can OCR extract text from CAD files?
A: No. OCR is designed for images and scanned documents, and it usually can’t read text from CAD vector drawings.
To protect CAD files in Safetica, use other classification options – for example:
- File path – where the files are stored
- App category – which application the files come from
- File type – the file extension (for example, .dwg)
Then create a policy to protect files that match those criteria. Learn more about data classification here.
Q: Can Safetica or its OCR detect watermarks in documents or images?
A: No. Safetica and its OCR feature cannot recognize or detect watermarks in documents or images.
Read next:
Data classification in Safetica
Data classification: What is Safetica unified classification
Data classification: How to create a new data classification
Data classification: How to select file types for content analysis


