Applies to: Safetica On-Prem
Looking for the Safetica Platform version? See: Safetica Platform: Installation guide
Introduction
To get Safetica up and running on-premises, you need to complete two main tasks:
- Install Safetica server: This sets up the services, database, and web console.
- Install Safetica Client: Install Safetica Client to each device you want to protect.
Prerequisites
-
License:
-
You need a valid license before you can collect records from devices.
-
When signing in to the Safetica console for the first time, you will be asked to enter your customer ID (preferred) or license key.
-
-
Supported browsers:
-
You can access the Safetica console from any modern web browser.
-
The only unsupported browser is Internet Explorer.
-
-
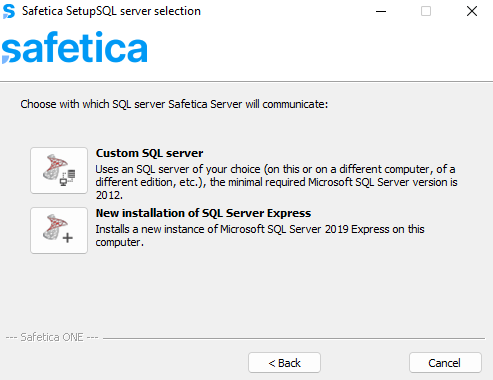
SQL Server:
-
Safetica requires an SQL database to store logs and settings. You can either let the installer set up MS SQL Server Express automatically, or connect to your own SQL server.
-
Minimum supported version: MS SQL Server 2016.
-
❗MS SQL Server Express is suitable for smaller companies, but it has storage limits. Depending on the version, the maximum database size (MDF file) is typically 10 GB (older versions) or up to 50 GB (SQL Server 2025 Express and newer. Learn how to upgrade to 2025 version here).
By default, when the database reaches 80% capacity, Safetica automatically deletes the oldest records until the database is less than 70% full.
How to install Safetica server
There are two ways to install Safetica server: automatic or manual. Choose automatic for a quick, standard setup, or manual if you want more control over the components and database configuration.
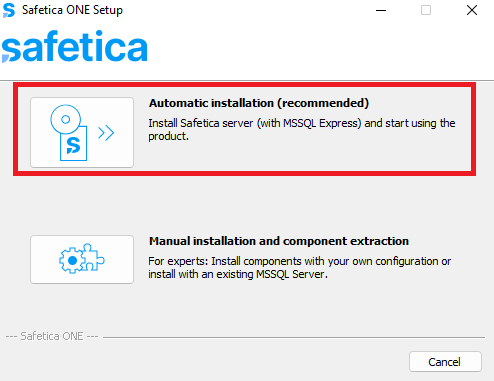
Option A: Automatic installation
The automatic installation sets up the SQL database and Safetica server components.
It installs the following:
- Safetica Management Service and Safetica Server services
- Microsoft SQL Express 2025 (with Safetica 11.30 and newer) with safetica_data database that is used for storing logs and settings
- Safetica web-based console running in IIS (Internet Information Services)
Steps:
-
Download the latest version of Safetica installer from https://go.safetica.com/safetica
-
Run the installer and select Automatic installation.
-
Set an admin password for the default database account (username: safetica). This account is utilized by Safetica server applications for SQL database authentication.
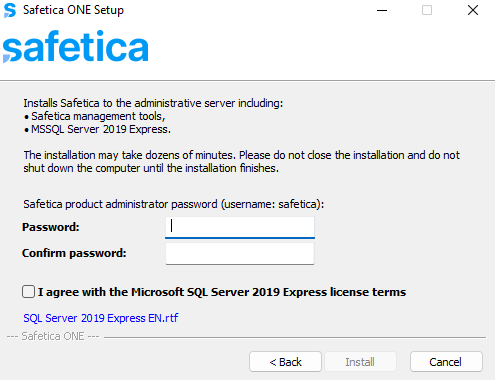
❗The username and password for the database account cannot be changed after configuration. Changing them would break the connection to Safetica services and require complete Safetica reinstalation.
4. Click Install to begin.
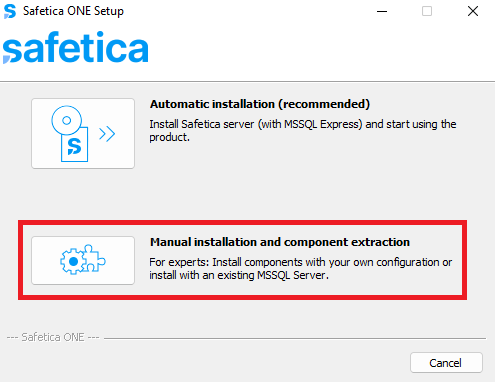
Option B: Manual installation
Manual installation gives you control over which components to install and which SQL server to use.
Steps:
-
Download the latest version of Safetica installer from https://go.safetica.com/safetica
-
Run the installer and select Manual installation
-
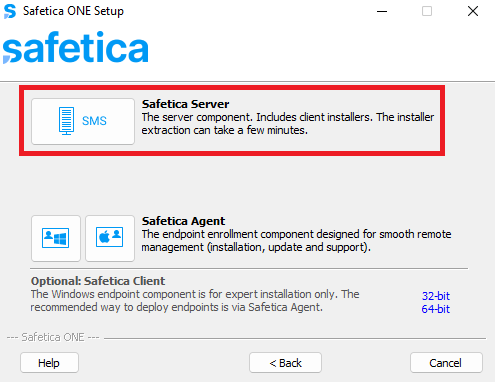
Select Safetica Server to install both the Safetica console and Safetica Server.
-
Choose whether to install a new MS SQL Server 2025 Express or use your own SQL server.
-
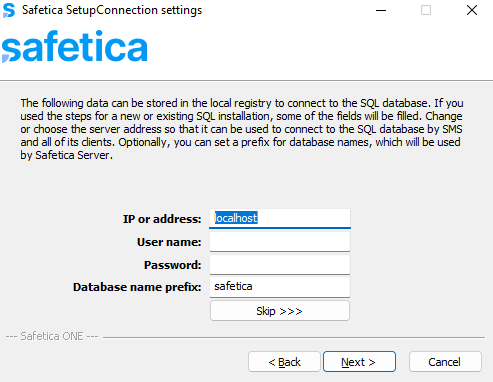
Enter the SQL server address, admin username, and password.
❗The username and password for the database account cannot be changed after configuration. Changing them would break the connection to Safetica services and require complete Safetica reinstalation.
How to sign in to Safetica console
Watch the video and read the details below:
- Open your browser and go to https://server_name/safetica (replace server_name with your actual server name).
- If you see a “connection not private” warning on first access, follow the steps mentioned in this article to resolve the certificate issue.
- Enter your customer ID (preferred) or license key. The server must be connected to the internet for verification.
- Create a new admin account by entering the required details, and agree with Safetica’s end-user license agreement.
- The first user to sign in must accept the Safetica Terms of Service on behalf of the organization.

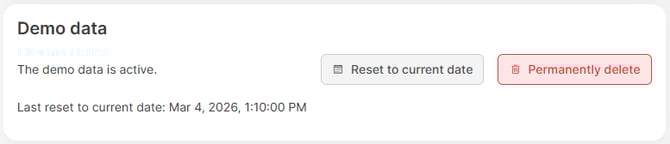
Explore Safetica with demo data
Your console comes pre-loaded with demo data, so you can explore Safetica’s features immediately - no Safetica Client installation needed
This lets you test the console interface, view sample records, and familiarize yourself with Safetica without affecting your environment.
How to remove demo data
When you’re ready to work with real data from your devices, clear the demo data out:
-
Go to Settings > General > Demo data.
-
Click Permanently delete.
✍️ To receive data from your devices, you must install Safetica Client.
How to install Safetica Client to your devices
To receive real data from your devices, you need to install Safetica Client on each device you want to protect. The client runs in the background and:
- Collects records about data movement and user activity.
- Enforces your policies.
Learn how to install Safetica Client here.
Advanced use cases: Safetica Maintenance Console
Safetica Maintenance Console is intended only for advanced maintenance tasks that are not yet available in the main Safetica console.
Install it only if you need it for a specific maintenance scenario. Learn more about Safetica Maintenance Console here.
FAQ
Q: Where can I find the download link to Safetica On-Prem? Where can I find the link to download the Safetica Universal Installer (the safetica.exe file)? Where can I download the latest version of Safetica On-Prem?
A: You can find the latest version at https://go.safetica.com/safetica or through the Partner Portal. For older versions, see the release notes or contact Safetica Support.
Q: Can I install Safetica On-Prem offline (without internet access)? Can I install Safetica On-Prem in air-gapped environments? Can I install Safetica On-Prem to an environment that is never connected to the internet?
A: Normally, you need to be connected to the internet to verify Safetica On-Prem license. If you have an air-gapped environment that is never connected to the internet and you need to perform offline installation, please contact Safetica Support for assistance. Offline installation is possible, just a bit more complex. The same system requirements apply as for online environments.
Q: When is the next update planned?
A: Public Safetica On-Prem updates are released approximately every 2-4 weeks.
Q: Can Safetica On-Prem be installed on NAS storage?
A: No, Safetica On-Prem cannot be installed on NAS storage.
Read next:
Resolving a certificate issue when accessing Safetica
System requirements and compatibility overview for the new Safetica