In this article, you will learn:
- About the upgrade
- Licensing changes
- Prerequisites
- How to prepare your environment
- How to upgrade Safetica ONE to the new Safetica On-Prem
- The Upgrade readiness check steps
- How to sign in to the new Safetica console
- What to do after you sign in to Safetica console
- How to update the companion Safetica Maintenance Console
About the upgrade
We prepared an upgrade from Safetica ONE to the new Safetica On-Prem which is done directly from Safetica Management Console.
❗Currently, the new Safetica On-Prem supports most (but not all) Safetica ONE features. You can find details about feature support here, please read it before performing the upgrade.
Licensing changes
- Learn more about the product plans for new Safetica on Safetica website.
- New Safetica utilizes user-based licensing (not device-based licensing like Safetica ONE). Learn more here.
- Learn more about licensing in new Safetica in the Licensing section of our knowledge base.
Prerequisites
Before performing the upgrade, you must meet the following requirements:
- Safetica Management Service must be updated to version 10.4 or 10.5 (10.5 is preferred - enables the cross-update of Device control).
- Safetica Clients must be updated to version 10.4 or 10.5 (10.5 is preferred - enables the cross-update of Device control).
✍️If you are NOT using Device control, you can upgrade to the new Safetica On-Prem from Safetica ONE 10.4.
If you are using Device Control, you must:
- Upgrade from Safetica ONE 10.4 to Safetica ONE 10.5 both your Safetica Management Service and Safetica Clients.
- Upgrade Safetica Management Service from 10.5 to the new Safetica On-Prem. Device control will be working for your 10.5 Safetica Clients, and you can gradually upgrade them to the new Safetica too.
3. Have Safetica Management Console installed – it is necessary for performing the upgrade.
4. Safetica Management Service must have an internet connection. Do not upgrade if you are running Safetica strictly offline. This limitation will be removed in the future.
How to prepare your environment
If you have automatic database backups enabled in Safetica ONE, a backup of your database will be automatically created before the upgrade.
❗If you have disabled automatic database backups in Safetica ONE, we recommend creating a backup copy of your Safetica ONE database manually and saving it to another computer. If you need help copying your Safetica ONE database, you can read these instructions.
How to upgrade Safetica ONE to the new Safetica On-Prem
You can watch this video to see how the upgrade is performed:
To upgrade, please follow these steps:
- Open Safetica Management Console.
- Go to Maintenance > Update and deploy > Upgrade to Safetica 11.
- Click Start Safetica 11 upgrade readiness check.

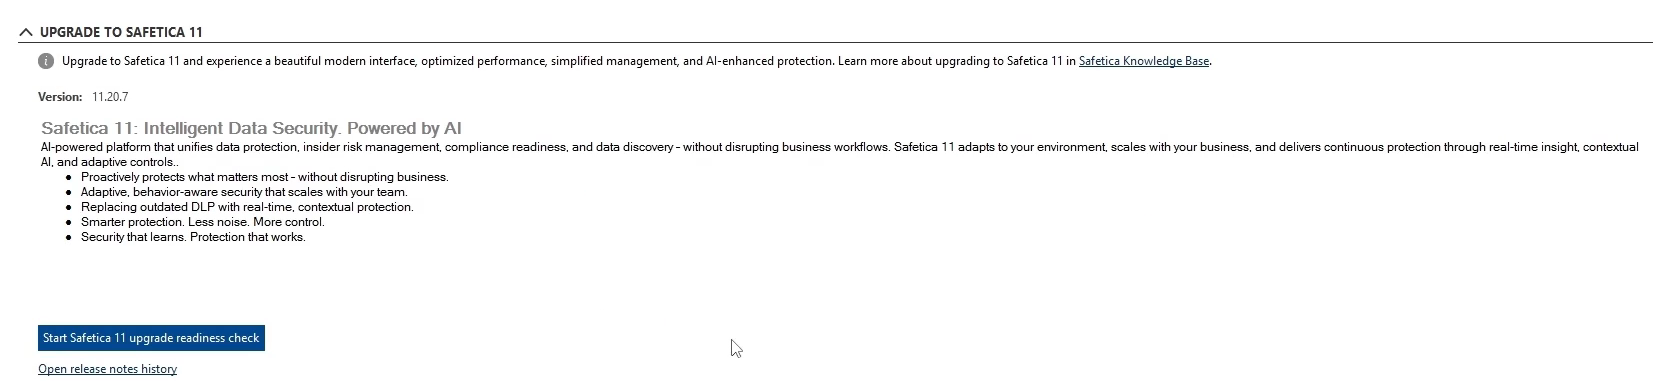
❗If you can't see the Upgrade to Safetica 11 section, please update to the latest version of Safetica 10.5 first.
4. The Upgrade readiness check will open. You can find the description of individual steps of the wizard here.
5. At the end of the Upgrade readiness check, after you pass all the steps, click Finish.
6. The upgrade will start.
8. After the upgrade finishes, you will be asked to update your Safetica Management Console.
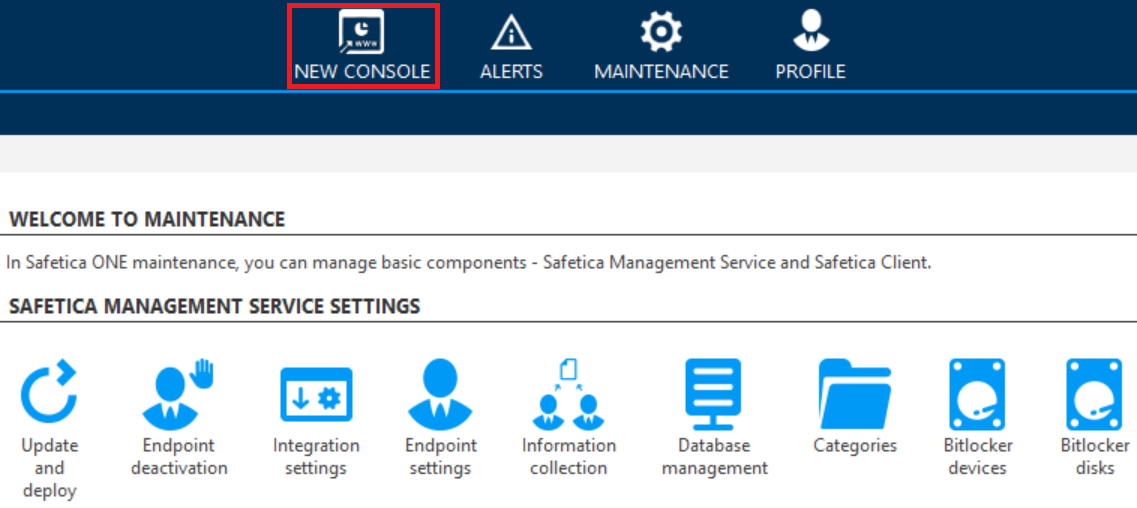
9. Afterwards, click the New console icon, and you will be redirected to the web-based Safetica console.
The Upgrade readiness check steps
The Upgrade readiness check will guide you through the upgrade and inform you about any requirements you don’t meet. Some checks cannot be by-passed (e.g. the version of Safetica Management Service or the version of SQL server), others can (e.g. Safetica Client versions and other checks).
Watch this video and see the details below:
1. Introduction
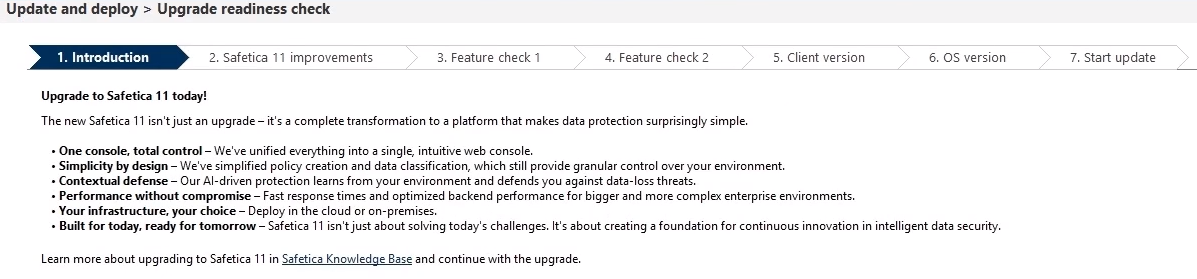
2. Safetica 11 improvements
Features listed in this step will not be available after upgrade to the new Safetica On-Prem. A detailed list of features can be found here.
If you have concerns about the sunset features, please let us know at support@safetica.com.
3. Feature check 1 - Features that are not yet available in the new Safetica On-Prem, but will be added in the future
Features mentioned in this step are not yet available in the new Safetica On-Prem, but we will gradually add them. You will only see features you are actively using in your environment.
Detailed list of features can be found here.
✍️If any of these features are detected in your environment, you can:
- Continue with the upgrade and lose the functionality.
- Stop the upgrade and wait for a future version that will contain the features.
4. Feature check 2 - Features are in the new Safetica On-Prem, but will need to be newly configured
Features mentioned in this step will need to be reconfigured after the upgrade. Detailed list of features and how to configure them can be found here. Please note that the features might behave slightly differently in the new Safetica On-Prem than in Safetica ONE.
5. Legacy console - Features that will still require the companion Safetica Maintenance Console
Features mentioned in this step serve for advanced (mostly maintenance) use cases that are not yet supported in the new Safetica console. They will, however, still be available in the companion Safetica Maintenance Console.
6. Client version
You will see this step, only if your Safetica Client versions are older than 10.4.
The minimum Safetica Client version installed on devices must be 10.4 or newer. Please update Safetica Clients to the newest available version to ensure your devices remain protected after the upgrade.
❗Older versions of Safetica Client will stop working after the upgrade, however, you will be able to update them via the new Safetica console.
7. Supported SQL server version
The new Safetica On-Prem needs Microsoft SQL Server 2016 or newer. If you have an older version, please update it.
8. Device operating systems
After the upgrade, Safetica Clients will support only the following operating systems on devices:
- Windows 10 (64-bit)
- Windows 11 (64-bit)
- macOS 10.15 and newer
❗If you are still using Windows 7 or 8, we strongly encourage you to update them. They are no longer supported by Microsoft and pose a security risk to your organization.
Safetica Clients on older systems will continue working (they will remain as Safetica 10.4 or 10.5 Clients), but you won't be able to update them and they may lack support for new features added to the new Safetica On-Prem in the future.
How to sign in to the new Safetica console
Watch the video and read the details below:
- To open the new web-based Safetica console, you can either:
- Open your browser and go to https://server_name/safetica.
- Click the New console icon in Safetica Maintenance Console.
- When you access the console in your web browser for the first time, you may receive a notification that the connection is not private. To resolve the issue, please follow the steps mentioned in this article.
- During onboarding, you will create a new admin account. You will not need to insert any license, since your current Safetica license will be used automatically.
- The first user to sign in to Safetica must agree with the Safetica Terms of Service.


What to do after you sign in to Safetica console
- Activate your old admin accounts and correctly set their access permissions. Learn more about access permissions in the following articles:
- Check your data classifications in the Data classifications section. See the following articles about how data classifications work in the new Safetica:
- Check your policies in the Policies section. Some of your policies might have been broken during the upgrade. See the following articles about how policies work in the new Safetica:
- Set up your reports again in the Scheduled reports section. See the following articles about scheduled reports in the new Safetica:
- You can find more features available in new Safetica that might need to be newly configured after the upgrade here.
How to update the companion Safetica Maintenance Console
- After you upgrade from Safetica ONE to the new Safetica On-Prem: you will be asked to upgrade Safetica Management Console as well. Afterward, you will not be immediately able to sign in to Safetica Maintenance Console. First, you must visit the new web-based Safetica console, create a new admin account, and go through a brief onboarding as described here.
- After you update the new Safetica On-Prem to a newer version: when you open the Safetica Maintenance Console, you will be automatically offered an update to a newer version.